In this tutorial I am going to explain how to manipulate/change elements of a webpage by using JavaScript and jQuery.
In web design, when we want to assign a style to our elements in our HTML code, we have a few choices:
1 - We can create a class in our style sheet and assign that class to the elements,
This method requires us to have an HTML code:
<div id="element1" class="my-class">Example Element</div>
<div id="element2" class="my-class">Another Example Element</div>
and a CSS code:
.my-class{
  color:red;
  font-weight:bold;
  font-size:20px;
}
As you can see, we have created two elements in HTML and added a style to these by using the my-style class in CSS. We can assign this class (my-style) to as many elements as we want. The output would be:
Example Element
Another Example Element
2 - Or we can create an ID (which is supposed to be unique per HTML) and assign it in a similar way to our HTML element,
HTML part:
<div id="element3" >I am a simple text..</div>
<div id="element4" >I am another simple text..</div>
CSS part:
#element3{
  color:blue;
  font-style:italic;
  font-weight:bold;
  font-size:20px;
}

#element4{
  color:green;
  text-transform:uppercase;
  font-size:20px;
}
In this example above, we use 2 different elements and we assign their styles separately by using two different styles: #element3, #element4. The result would be like this:
I am a simple text..
I AM ANOTHER SIMPLE TEXT
3 - Alternatively, we can add the styling directly to the element without requiring a style sheet (which is highly discouraged).
HTML part:
<div style="text-transform:capitalize;color:magenta;font-weight:bold;" >I am a simple text..</div>
<div style="text-transform:lowercase;color:gray;font-weight:bold;" >I am another simple text..</div>
The output would be like the following:
I Am A Simple Text..
i am another simple text..
As you see, the HTML code looks a lot messier this way..The CSS is buried in the HTML and it is quite hard to make changes especially if multiple elements need to be modified. I suggest you to avoid this method (inline-styling) unless you have no other choice.
Another Way of Changing Styles
We have seen 3 different methods that allow us to set styles to our HTML elements. Hovewer, there is another approach: introducing JavaScript to your elements. You can use JavaScript to directly set a style on an element, and you can also use JavaScript to add or remove class values on elements which will change which style rules get applied.But Why Would You Want to use JavaScript ? Don't We Already Have a
Few Ways of Doing This?
Well, yeah we do have the methods above and they are sufficient most of the time but there are some situations where we require the flexibility of JavaScript. Especially as your page content gets more interactive, where you want styles to dynamically kick in based on user input, where you want to hide some elements depending on an event on the page, some code having run in the background, and more. In these sorts of scenarios, the CSS model involving style rules or inline styles won't help you. While pseudoselectors like hover provide some support, you are still limited in what you can do. Because of these reasons, we require JavaScript.Let's see an example:
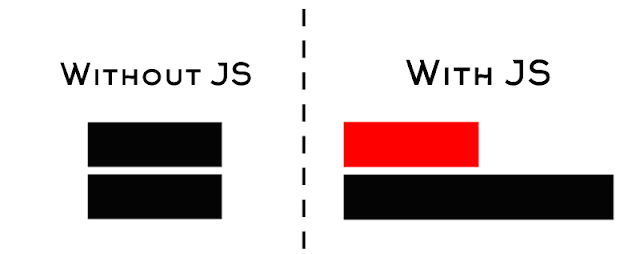
In the following example, we will create two elements which have a common style rule but different IDs and we will manipulate their styles by using JavaScript.
Here is the HTML code;
<div id='demo1' class='demo'></div>
<div id='demo2' class='demo'></div>
This is the CSS part:
.demo{
  height:30px;
  width:90px;
  background:black;
  margin-bottom:5px;
}
And finally the JavaScript kicks in and changes this common style rule:
var d1 = document.getElementById('demo1');
d1.style.background='red';

var d2 = document.getElementById('demo2');
d2.style.width='180px';
And here is the result for this example; The figure shows the output with and without the Javascript part:

Let's see another example:
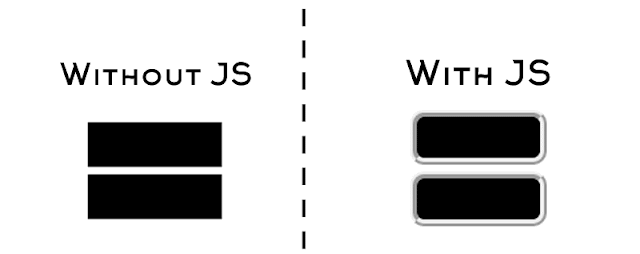
Instead of adding style rules to the IDs of the elements, we can modify their classes via JavaScript. We use querySelectorAll to collect the elements in a variable array and then a for loop to modify the styles of all the occurences of that class. Keeping the same HTML and CSS as the previous example, if we modify the JavaScript code:
var demo = document.querySelectorAll(".demo");

for (var i = 0; i < demo.length; i++) {
    demo[i].style.borderRadius = '10px';
    demo[i].style.border = '5px ridge';
}
This would be the result:

Alright, we have mentioned pretty useful stuff so far, but let's continue and take a look at these style manipulations from a jQuery perspective. But first, what is jQuery and why do we need it ?
JQuery is a cross-platform JavaScript library designed to simplify the client-side scripting of HTML and we basically use it to simplify our code. However, it might be actually less efficient to do the same thing with jQuery if we can do it in JavaScript easily because we need to import the jQuery library into our page which is around 80kBs and increasing.
Here is an example:
This time we also add jQuery library to our HTML code:
<script src="https://ajax.googleapis.com/ajax/libs/jquery/2.2.4/jquery.min.js"></script>
<div id='demo1' class='demo'></div>
<div id='demo2' class='demo'></div>
This is the CSS(No change):
.demo{
  height:30px;
  width:90px;
  background:black;
  margin-bottom:5px;
}
And finally the jQuery part:
$('.demo').css('border','5px dashed');
$('#demo1').css('background','red');
$('#demo2').css('background','blue');
As you see, with JQuery, the code is very simple and direct to the point. Finally this is the output:

The ultimate choice is yours: JavaScript or JQuery. Pick whichever you want while modifying your HTML elements as long as it matches your needs.
Alright everyone, that's it for this tutorial. Please share, like or comment if you have any questions or comments. Happy Coding!


Disqus Comments Loading..